Welcome to Part 1 of my Horizon View and Windows 10 Image Building Series. I’ve been wanting to get this series out for quite some time. There’s a number of these types of guides out there as you may have seen. I’m going to throw my spin onto this ever-changing topic with these articles. I will detail every step I take in building an image for VDI desktops from VM Configuration all the way to installing applications in App Volumes and working with UEM. This series is going to be a monster so keep checking back.
This first article is going to focus on the configuration of the Virtual Machine. Surprisingly there’s quite a few steps and things to consider in properly configuring a VM to prepare it for a VDI master or gold image. I’m focusing on Horizon View using Windows 10 (1803) in this article. I’ll be using a numbered list so you can easily follow this guide while adding detail around specific sections where necessary. Let’s get started!
Thanks!
I want to first give a huge thanks to Lieven D’Hoore over at https://www.ituda.com/. I’ve been using his Image Creation guides for years. Starting with his Windows 7 guide and then moving over to his Windows 10 Golden Image Creation article. He was gracious enough to allow me to use portions of his guides in my content here. I’ll hopefully be able to do it justice and add some of my own flavor to it. That guy lives and breathes EUC and technology, Go check out his site!
VM Configuration
- Download the Windows 10 1803 64-bit ISO and upload it to a datastore. We will be installing Windows 10 Enterprise Edition from that ISO in the next article.
- Create a new VM on the VDI cluster. You have a separate VDI cluster right? If not, you should consider it since separating that workload is a VMware recommended best practice. You don’t want your desktops overrunning resources meant for productions servers and vice versa.
- Pick the name, folder location, compute and storage resources to use
- Set compatibility (hardware version) at the highest level available for your version of vSphere
- Set Guest OS Family to Windows and Guest OS Version to Microsoft Windows 10 (64-bit)

- Customize Hardware – This will vary by user workload and available resources. Nvidia has a nice PDF (Page 4) that explains the differences between the types of user workloads as it relates to vGPU enabled desktops. Even without vGPU you’re going to have Knowledge workers and Power Users though. The Designer users pretty much require a vGPU enabled desktop and more resources.
- CPU: Make sure you set this according to the VM density per host you want to achieve and the performance level required for your users. Allocating too many cores to users who don’t need them lowers your VM density per host. Allocating too few cores to users who do need them will cause performance issues. Something else to consider under the CPU section is the option to select the number of Cores per Socket. For VDI leave it at 1 x Core per Socket. There are potential instances where you might change this but it’s usually when you have a much higher core count needed.
- Knowledge workers: 2 x CPU
- Power users: 4 x CPU
- Designers: 6+ x CPU

- Memory: Reserve all guest memory if you’re using vGPU. If you’re not using vGPU you can still reserve all guest memory If you’re not overprovisioned. Finally, if you don’t have vGPU and you’re going for higher density do not reserve all guest memory.
- Knowledge workers: 2 GB
- Power users: 4 GB
- Designers: 8 GB+ (I’ve got some customers with 24GB VDI desktops)

- Hard Disk: 60GB – Thin Provisioned – Windows 10 is awesome, but it also uses a ton of disk space. Even running the scripts that I will detail in a later article it still uses between 18GB to 21GB of disk space if not more. Any future updates, patches or applications can eat up additional space. Also while you’re building the image you have to worry about the pagefile and if you’re building for the higher end users that can be pretty big. Remember we’re thin provisioning here so I recommend 60GB to start. That will give you a comfortable amount of slack space to work with moving forward.

- SCSI Controller: LSI Logic SAS – There’s an ongoing debate whether or not to use LSI Logic SAS or Paravirtual. Paravirtual is built for extremely high I/O. You’re just not going to have desktops doing half a million or a million IOPs and if you do you’ve got problems. Go with LSI Logic SAS and all will be right in the world.
- Network: You should have a VDI port group already created and DHCP for that subnet/VLAN setup prior to building the image to make things easier.
- Choose your VDI Port Group on the New Network dropdown
- Check the Connect at power on box
- Select VMXNET 3 from the Adapter Type dropdown

- CD/DVD: You need to install Windows so let’s attach the ISO to the VM.
- Select Datastore ISO File from the dropdown
- Browse to where you uploaded the Windows 10 ISO and select it
- Place check in Connect At Power On

- Floppy Drive: Remove this entirely. There’s almost no reason you would need this on a VDI desktop image.
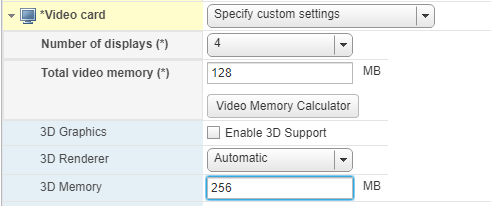
- Video Card: This could vary a little bit depending on if you’re using a vGPU or not. That being said the following settings should work fine with or without vGPU.
- On the Video card option select Specify customer settings
- From the Number of displays (*) dropdown select 4
- On Total video memory type in 128
- Do not check Enable 3D Support
- Set 3D Renderer to Automatic
- Set 3D Memory to 256

- CPU: Make sure you set this according to the VM density per host you want to achieve and the performance level required for your users. Allocating too many cores to users who don’t need them lowers your VM density per host. Allocating too few cores to users who do need them will cause performance issues. Something else to consider under the CPU section is the option to select the number of Cores per Socket. For VDI leave it at 1 x Core per Socket. There are potential instances where you might change this but it’s usually when you have a much higher core count needed.
- VM Options tab – There’s a few things on the VM Options tab we need to set and then we’re almost done.
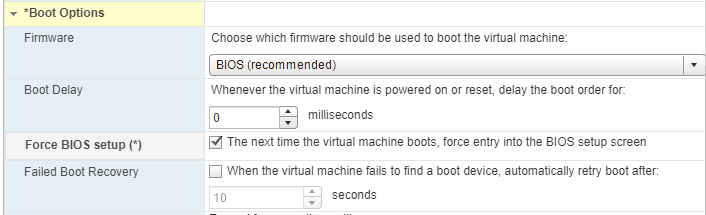
- Boot Options section – Place a check in Force BIOS Setup. This will make the VM automatically go into the BIOS on the next boot.

- Advanced section – Uncheck Enable Logging. The recommendation here is to disable virtual machine logging since these are VDI desktops. I can see a case if these were persistent desktops to keep this enabled though.

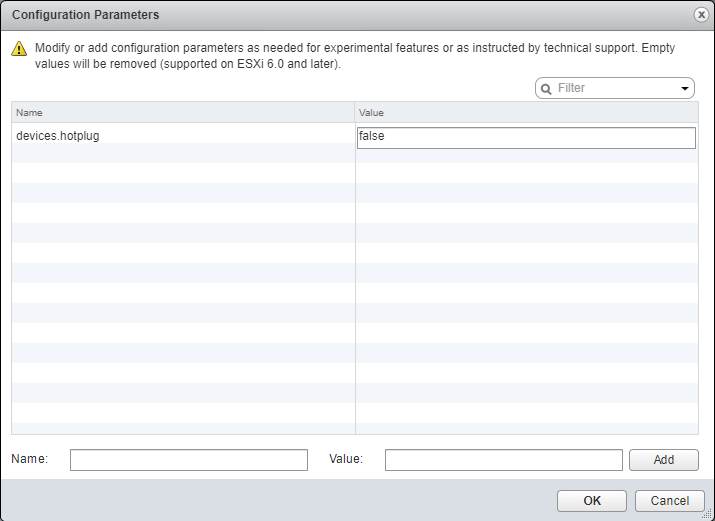
- Disable HotAdd/HotPlug capability – This is surprisingly important unless you want your users to be able to disconnect/eject removable devices including disks. That could cause some problems. Here’s the VMware KB about it for more info and there’s many more detailed articles out there as to what can happen if you leave it enabled.
- Configuration Parameters section
- Select the Edit Configuration button
- Name: devices.hotplug
- Value: false
- Click Add

- Disable HotAdd/HotPlug capability – This is surprisingly important unless you want your users to be able to disconnect/eject removable devices including disks. That could cause some problems. Here’s the VMware KB about it for more info and there’s many more detailed articles out there as to what can happen if you leave it enabled.
- Boot Options section – Place a check in Force BIOS Setup. This will make the VM automatically go into the BIOS on the next boot.
- Boot the newly created VM to BIOS
- Power on the VM
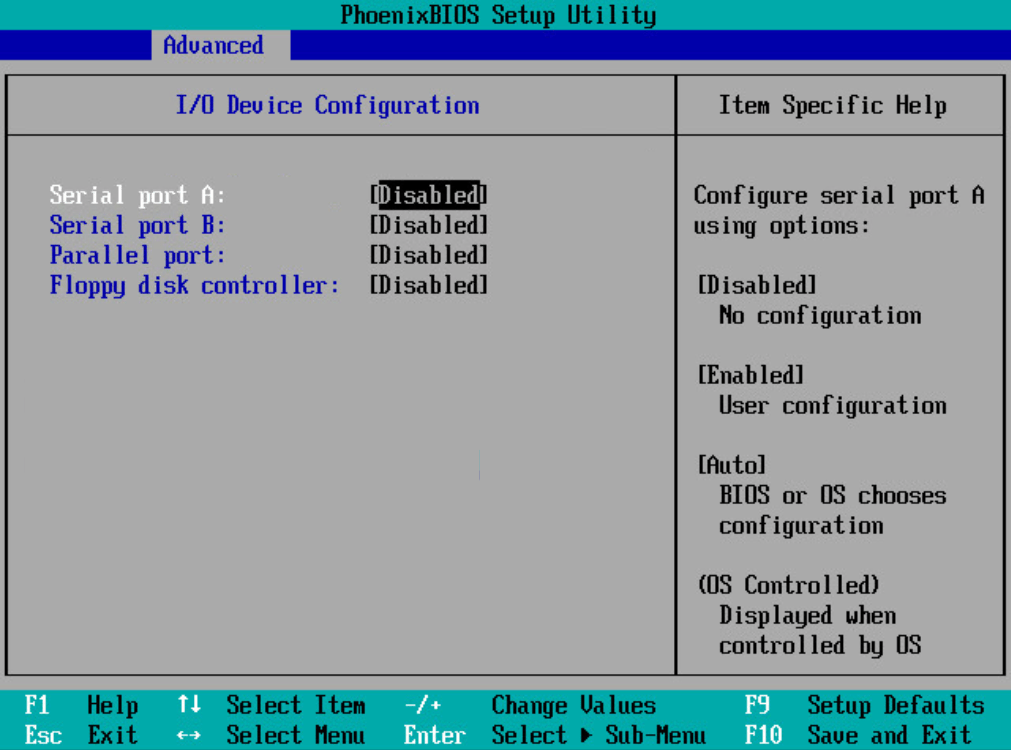
- Navigate to the Advanced tab in the BIOS
- Select I/O Device Configuration
- Disable Serial port A
- Disable Serial port B
- Disable Parallel port
- Disable Floppy disk controller

- Select I/O Device Configuration
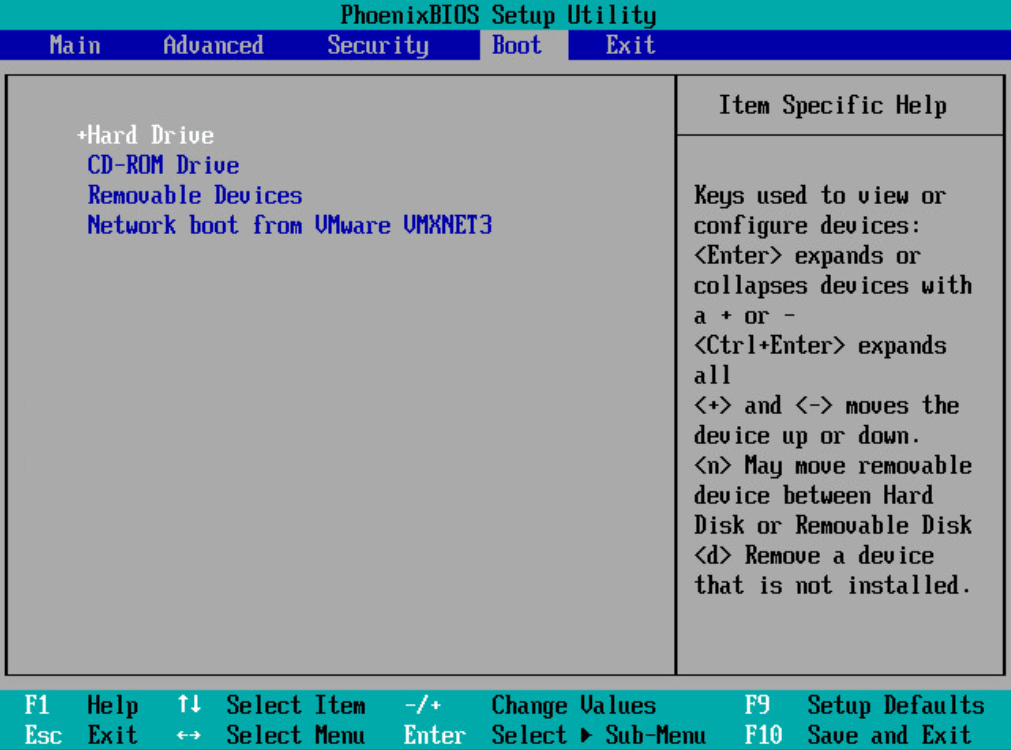
- Navigate to the Boot tab
- Set Hard Drive as first in the list and CD-ROM Drive as second
- Save and Exit by hitting F10 to finalize the changes


VM Configuration Complete
You’ve successfully configured the Virtual Machine settings. The VM is now customized for use with Horizon View and ready for Windows 10 (1803) to be installed. In fact that’s the next article in this series. Thanks for reading and stay tuned for the continuation of this series.
Is there a reason you keep your VDI VMs at BIOS and not UEFI?
With UEFI and Win10 (and server 2016), you can have secure boot, Microsoft VBS (in esxi67) etc
https://www.virtuallyghetto.com/2017/10/tip-from-engineering-use-uefi-firmware-for-windows-10-server-2016.html
https://blogs.vmware.com/vsphere/2018/04/introducing-vsphere-6-7-security.html
https://docs.microsoft.com/en-us/windows-hardware/design/device-experiences/oem-vbs
If you are building Windows 10 or Windows Server 2016 VM’s today I would HIGHLY recommend you build them with EFI firmware enabled. Moving from traditional BIOS/MBR to EFI (UEFI) firmware after the fact introduces some challenges later on down the line.
Thanks for reading and commenting! Yes there is a reason. This guide is meant to be as vanilla as possible and accessible. While there are some assumptions in my series around having a certain version of vSphere and Horizon View it’s entirely possible to follow most of my guide and use different versions of Windows 10, vSphere and Horizon View. Eventually I imagine all vSphere components, VM’s and infrastructure will be using Secure Boot/TPM 2.0/VBS/Credential Guard/VM Encryption of some sort by default, we’re just not there yet. Many infrastructures aren’t ready for the overhead, potential costs, hardware support and management involved in enabling those features. That HIGHLY recommended bit assumes that everyone is ready for it or even understands the implications. They aren’t and they don’t. All that being said, if you do have the infrastructure to support UEFI, Secure Boot, KMS, TPM 2.0, etc. you can and should absolutely enable those features. Thanks again for reading!
Well, I don’t agree, which is my prerogative 😉
I would still (recommend) enabling UEFI on new master win10 image (and get GPT instead of MBR). Then you are ready for secure boot/TPM 2.0/Credential Guard/VBS/VM encryption/etc _later_, when you want. If you use BIOS, you will get a lot of work to change VDIs (probably ending up making a new master image..)
Anyway, it was a good read, and commenting here make people at least think about enabling UEFI as default, as it shouldn’t cause any problems (with ESXi 6 or newer)
Thanks again for commenting. I think if you re-read my response I’m ultimately agreeing with you. My point is that most environments just aren’t ready for that and I deal with a ton of SMB and Mid-market customers as well as some Enterprise. The only ones even remotely able to implement those features in most cases would be the enterprise customers. Sure if you wanted to switch BIOS to UEFI it is a lot of work. To future proof yourself I would agree you could use UEFI instead of BIOS, but what happens when the next version of Windows comes out (1709, 1803, etc). You should be building a new image anyway so it’s definitely something you don’t have to do yet, especially if you can’t support it. It’s something to talk about I think and I’ll add some content in the article to talk about UEFI when I get a chance. Thanks for bringing it up I appreciate the dialog and thanks for reading!